Thursday, April 3, 2014

Simple Chicken Enchiladas

I have been living in the Netherlands for a little while.
If there is anything that I have learned about Dutch cooking while living here, it is this:
Dutch people are simply fantastic when it comes to making their own food.
Stampoot.
Vla.
Herring with pickles and onions.
Smoked sausage with mustard.
Patat. 
Hutspot.
A sandwich with 1 piece of cheese and 1 piece of ham. 
And that little thin layer of butter.
And maybe Indonesian food...
Maybe...
But the boat stops there...

It's not that the Dutch aren't capable. They certainly are.
They just tend to Dutchify every ethnic recipe they get their hands on.
(And Germans do this too)

So Dutch and German people pay attention when I say this:

Peas, Brussels sprouts (spruiten), endives, leeks, beets and carrots do not go in Greek, Mexican OR Italian food.

(like enchiladas, tacos, lasagna, moussaka, pizza, etc)
This is bad.
Never.
Ever. 
Ever.
It is politically incorrect.
So just don't do it.
Stop.
This is not the lekker way to go about cooking.

Now that I have that off my mind...
Let's talk about enchilada sauce.

I haven't found a pre-made sauce here yet.
And I NEED enchiladas from time to time.

So I came up with a recipe.
It's easy and quick.

Enchilida Sauce Ingredients:


3 cans of tomato paste ( I use Heinz because they don't have the BPA liner in their cans)
1 tsp garbanzo bean flour (any flour will do: wheat, rice, corn, etc)
1/2 cup olive oil
1 tbsp garlic powder
1 tbsp cumin 
1 tsp sea salt
1 tsp cayenne pepper (more or less depending on your like/dislike of spicy food)
1.5 cup of water
2 roma tomatos (diced)

Instructions:

In a sauce pan add olive oil and garbanzo flour. 
Let it simmer for a few minutes until it starts to boil. 
Then add garlic powder, cumin, sea salt and cayenne pepper. Stir.
Let simmer for 2-3 minutes.
Add 3 cans of tomato paste, stir it in to the mixture and continue to let it simmer. 
Now add the water and stir. 

Let simmer until it comes to a boil, then turn off the burner, cover and set to the side while you prepare the rest of the recipe.

Next, take a 200gr chicken breast and place it in a roasting pan.

Separately roast the chicken breast with tomato paste and olive oil coating it. Place it in the oven at 200c for 20 minutes. 
When you take the chicken out, start to pull it apart using two forks. 
This is called shredding.


Now take your garbanzo bean flour tortillas (or any other tortillas you want to use. This is what I made earlier today) and lay them out in a square or oval roasting dish. 
Begin to stuff them with diced onion, red pepper, raw spinach leaves, etc.
I had a left over sweet potato from last night that I added. 
And don't forget the shredded chicken.
Really, you can add whatever you want.
If carrots, leeks, beets and peas are your favorite foods you can even add them too.
But this is still a politically incorrect thing to d0...


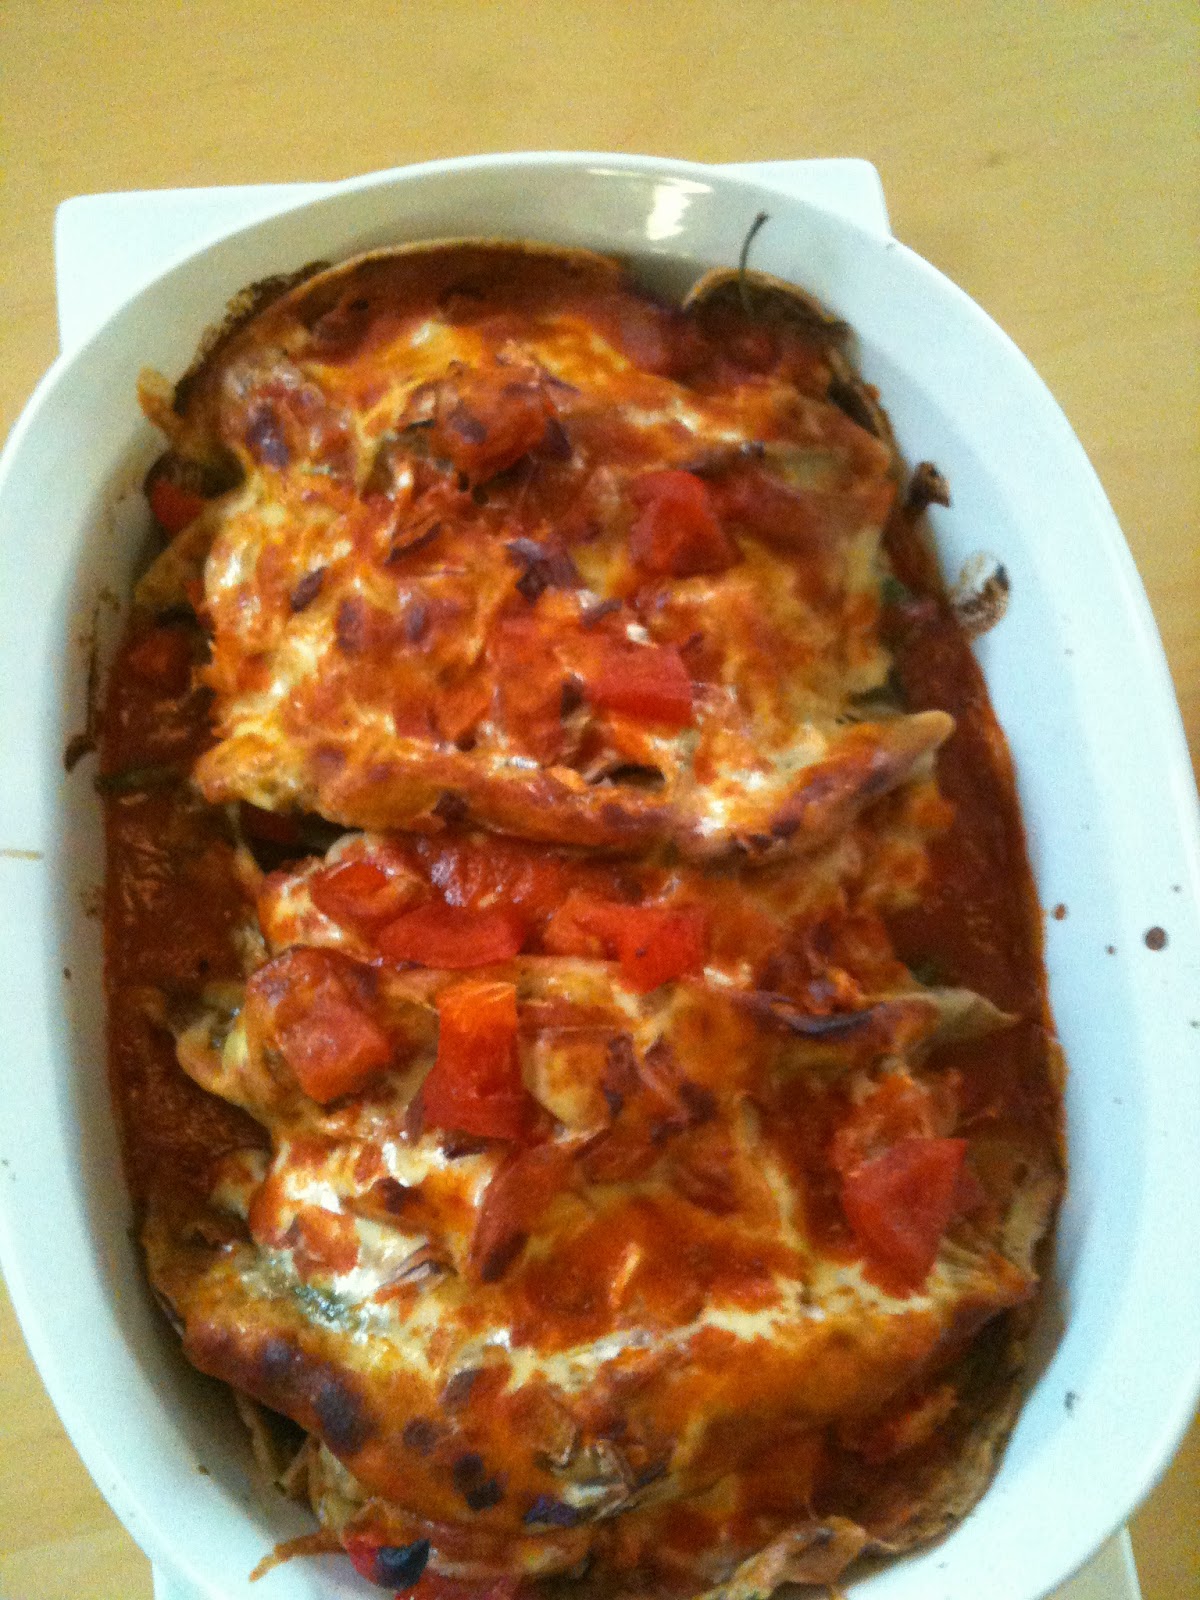
Now pour on your enchilada sauce covering the surface. 
Top it with enough cheese to cover the surface as well.
If you have shredded cheese use that. I had some gouda cheese slices and that worked too. 
Cheese is cheese.
It melts.
If you have extra enchilada sauce go ahead and pour it on.
You can never have enough (just make sure the enchiladas aren't drowning)
Bake in the oven at 210 C for 20 minutes. 


And enjoy with the ones you love!


The rest of the enchilada ingredients:

5-7 Tortillas
1 Handful of raw spinach per enchilada
1 Red Pepper
1 Diced Onion
Shredded Cheese
200 gr Chicken Breast
1 Can Tomato Paste

Garbanzo Bean Flour Tortillas {Vegan, Gluten & Dairy Free}


This afternoon, as I sat in the sun on my balcony, reading out of 1 Kings 17:8  about the Widow at Zarapeth I had to stave off hunger at the mentioning of bread.

Basically Elijah visited a village named Zaraphath and met a widow that God had instructed to feed him while he was there. 

"He asked her for some water and then some bread. She responded, "I swear by the Lord your God that I don't have a single piece of bread in the house. And I have only a handful of flour left in the jar and a little cooking oil in the bottom of the jug. I was just gathering a few sticks to cook this last meal, and then my son and I will die.

But Elijah said to her, "Don't be afraid! Go ahead and do just what you've said, but make a little bread for me first. Then use what's left to prepare a meal for yourself and your son. For this is what the Lord, the God of Israel says: There will always be flour and olive oil left in your containers until the time when the Lord sends rain and the crops grow again!".

So she did as Elijah said, and she and Elijah and her son continued to eat for many days. There was always enough flour and olive oil left in the containers, just as the Lord had promised through Elijah."

And while this story encouraged me to trust in my God for His provision, it also made me really miss the taste of bread and flour...
Yummmmmm...

And then I remembered the conversation I had with my good friend Rachel this last week about how she taught herself to make tortillas while she was living in Russia as a missionary (because somehow Mexican food hasn't made its way over there yet. What? No Mexican food? ... I just don't understand how people can live without Mexican food.)

Anyways, it has been forever since I had my last tortilla. 
So, thanks to Elijah and my friend Rachel for inspiring me to try making my own gluten free tortillas.

It all started with an unopened bag of garbanzo bean flour that had been sitting in my cupboard for at least a year. 
I ordered it from vitacost.com which is this wonderful website that sells discounted health food products (and they ship internationally).
I admit that I was hoarding it because ordering internationally is expensive and inconvenient.

And that's just the sort of thing you do when you live overseas. 
Every time I get a bag of chocolate chips or BBQ sauce sent over from the USA I end up hoarding it. And I hold onto it as if it were the last precious thing in the world. 

But the other day, as I was picking up some rice flour at Ekoplaza in Haarlem I saw kikkerwertenbloem and was able to recognize kikkerwerten means garbanzo bean... So they have garbanzo bean flour here too! 
Yay, no need to hoard!

Just a funny little note: kikker also means frog in Dutch. So I now think of garbanzo beans as frog beans instead of chick peas.

This afternoon I spent about 2 hours making tortillas. And to my surprise they were effortlessly delicious!
I kept eating them as I was cooking.

And then Jens was like "what are you cooking? It smells good" and I made him aware of how yummy these things are. 
So before I knew it I had to mix up another batch.

Also, here are some great facts about garbanzo bean flour: Facts about garbanzo bean flour
I guess it's full of protein, fiber and iron. 

(Here's the mess you've been waiting for)
Ingredients for Garbanzo Bean Tortillas:

1 cup garbanzo bean flour
1 tsp sea salt
1 tsp cumin (optional)
1 tsp olive oil 
1 tsp oregano (optional)
1 cup of water

Vegan egg:
2 tbsp ground flax seeds
2 tbsp warm water
 {I had to grind the flax seeds since I only had whole)


Makes about 5-6 tortillas.

You will also need a greased non-stick pan and a flat bottom wooded spoon. 


Cooking Instructions: 
                                                          
Mix together the 'vegan egg' ingredients and let them sit for about 3-4 minutes to let it thicken.

Separately mix the garbanzo bean flour, olive oil, salt, cumin, oregano and water together with a whisk (until the clumps are gone).
The consistency will look like waffle batter. If you find it to be too sticky add about 2/3 cup more water. If it is too sticky it will be hard to spread out over the pan but make sure it isnt too watery either.
Now add the 'vegan egg' mixture.

Preheat frying pan on low heat. I have a gas stove top so my 'low heat' is more like medium heat.

Pour about 1 cup of the batter into a 28 cm frying pan and spread it out over the pan in circular motion with a flat bottom wooden spoon. 


Allow it to cook on low heat for 2 minutes and then turn over. 
It is ready to be turned over when it easily rises off of the pan.
After turning over, let it cook for 1 minute. 
It should have light brown spots like this:


These little tortillas are so delicious and nutritious!
High in protein, fiber and iron.

Now I just don't know what to make for dinner.
Enchiladas, soft tacos or falafel... Hmmm... Decisions. Decisions...


Wednesday, April 2, 2014

Pear and Walnut Ice Cream Sunday

So yay!
It's spring time!

April is here.
The birds are singing.
The flowers are blooming.
I ended my second job yesterday.
Which is why I'm so happy.
Because I was 
starting to
have a
major
burn
out.

So today, I celebrated.
And I celebrated BIG time with a bowl of yummy ice cream.

Pears are in season.
And I just happened to have a giant ripe, sweet and juicy one sitting on the countertop.
And a container of organic heavy cream (slagroomijs) ice cream sitting in the freezer.
So, why not?


I paired it with:

Three cracked walnuts
A dash or two or three or four sprinkles of cinnamon

And then I indulged in a spoonful of YUM!


And there you have it.
The first recipe I am posting to my blog is neither healthy nor a meal.
So, I am very very sorry about that.
But it was simple enough to share.

I am too tired to document what I am cooking for dinner tonight
so maybe tomorrow I will post my first (real) recipe.

Drumsticks, roasted sweet potatoes and steamed spinach is what's on the menu for tonight.
(Just in case you were curious)
Nothing fancy.
Whoo... Ok, I am tried.
Time for me to go check on those drumsticks.

Until then... Go find yourself a juicy pear and some slagroomijs (or vanilla ice cream works too)
And enjoy!


Tuesday, April 1, 2014

Pan vs Pan

So last year I wanted to buy a really really really good frying pan. 
We had some not so good ones in the early years of our kitchen.
Not so good meaning that when it came time to cleaning those dumb pans one of us had to scrape and scratch them clean. 
And then they didn't really get clean.
And then they didn't cook very well.
And my cooking was not living in the days of it's glory back then.
My cooking was bleh.

And well, we settled on those pans because they sort of did the job for the time being.
And while sometimes this is ok to do... 
If you plan to make homemade meals, a good pan is an absolute must.

It doesn't matter if you are camping in the middle of the desert.
Or cooking for the president.
If you are going to cook a decent meal, regardless of the circumstances, a quality pan is essential.
The great part is that it doesn't have to cost a lot of money.

So this is why I "invested" (I realize I say this word A LOT! But that's just what quality kitchen tools are: investments)

So I bought two pan sets and spent a year testing them out...

(And I know, these are non-stick pans. Not the best in the whole world. Cast iron is the best. I know. I know. But for everyday wear and tear non-stick is what I use)

The Face Off:

Cost: €25

This is a great pan for frying omelets, stir fry, pancakes, sautéing. 
It's very smooth and you really don't need to use a lot of oil to keep it from sticking. 


Cost: €96

This pan set has been a good and bad 'investment'.
The searing pan is excellent. In fact, I bought this set on ebay for  half of the price so it was worth it just for that one pan alone. 
It cooks pork tenderloin, salmon filet, steaks and chicken breast beautifully and it has worked exceptionally well as a frying pan for, well, deep frying things like southern fried chicken.
(I know, deep frying is not healthy but sometimes we crave a little soul food)

The 'slide' pan however has left me frustrated. 
Nothing slides. 
I had to use a lot of oil in order to keep things from sticking and even then, things stick and develop a crusty layer on the bottom.
Also, I have only used silicone spatulas on the surface, not even a wooden spoon, and only the soft side of a sponge while cleaning and there are small scratches on the cooking surface.
And then I store the pans with felt liners between them so that they don't scratch.
I can only assume that this pan is an annoying flunky.
It does not slide.

And then when I contacted customer service they were not very helpful.


Conclusion:

More expensive (or name brand) does not always mean better quality.
Lesson learned.
While I love the searing pan and lid from Calphalon, I am going to have to say that the Tefal Enjoy frying pan set was the better investment in non-stick cookware.
I still use the 'slide' Calphalon pan from time to time but prefer the Tefal over it.

It's easier to clean, true to its claim and was 1/4 of the original price. 


Silicone Kitchen Tools

So, just like every good chef needs a good knife, every good chef also needs to invest in some proper kitchen tools.

And everyone has their own preference. Mine is silicone.

I really love and appreciate silicone cooking utensils and tools.
Mostly because I am not a fan of plastic coming in contact with heat as this has been known to cause cancer. Read more about this here!

But with silicone the risks of evil toxic plastics being released into the food are lessened due to the fact that it can withstand heat for up to 400 degrees F unlike other materials such as nylon.

I have enjoyed using Oxo silicone cooking utensils and Le Creuset as well.

 I am also a HUGE lover of these silicone BBQ tongs from Jamie Oliver's line.
They are awesome for flipping over chicken breasts on my grill pan.


Le Creuset Grill Pan Review

So I love BBQ.
I love eating BBQ.

It's something my dad did regularly (it was his thing), even in the winter time when it was pouring down rain... And even when it snowed.
My dad would be outside with a rain poncho... BBQ'ing.
Yes our neighbors did think he was crazy.
And he didn't care.

He even liked to BBQ during the holidays.
Guess what we had for Thanksgiving?
BBQ'ed turkey.
Guess what we had for Christmas?
BBQ'ed turkey.
Guess what we ate when I would visit him?
BBQ'd ribs, chicken, shrimp, steak...You name it, it was on the grill.

And that man could make a mean ol' spicey BBQ sauce or marinade just as well.
It was and still is the best BBQ sauce to my recollection.
I still hope that one day I can make a sauce half as good as his was.

So, while I miss him and his amazing BBQ skills and I wish I could have BBQ everyday...
Yeah, no. That won't be happening for the time being.
I live in an apartment with a small balcony and it isn't an option to char my food unless I go to the park. And believe me when I say that I don't want to mess with my crazy Dutch neighbors.

So, I'll finish my point...

Problem solved because I now have the coolest grill pan on the planet:
It's so heavy.
And so pretty.
And I love it.
And I will call it mine forever.

Dear Le Creuset, if you ever read my blog, please know that I love you!


It's perfect for getting a good char on chicken, steak and veggies.
Yum!
And the best part is that the flavor is there. That smokey, burnt flavor is there.

And fat from meat melts and drips to the bottom of the pan. Just like it would with an outdoor grill.

And it's non-stick. I just leave the meat on the pan, when it's ready to be flipped it will naturally release. Very nice.

The neatest thing is that it's a cast iron pan but a low maintenance cast iron pan.
That's right! I don't have to season this one or wash it with salt scrub and coat it with bacon fat before storing it away.

All I need to do is wash it with a soft cloth, dish soap and put it on the shelf. I do coat it with a little oil just because somehow that seems like the right thing to do.

I have a designated dish cloth just for drying it since no matter how much I clean it it will always have a little char that rubs off on my dish towels. So it has it's very own designated dish towel.

So, I love it and recommend it to anyone that needs an indoor grill.

Every Chef Needs a Good Knife!

In order to cook a meal with precision, ease and delight it is important to invest in a good knife.
I figure all I really need is one really good quality and sharp knife for cutting vegetables, fruits and meats.
And one quality serrated knife for trimming and cutting breads.

While I think there are several excellent companies out there like Zwilling or J.A. Henckels, I invested in a Cutco knife because, well, when I asked my friends on Facebook which knife to buy a herd of people responded about how much they love their Cutco knives. They loved the lifetime warranty, guarantee, free sharpening and replacement, ect, ect. So I gave in and invested in my own. Needless to say, I love them.

So last Christmas I put two Cutco knives on my wish list and guess what my husband got me?

The santoku knife and the trimmer. (Cha-Ching!)

These are literally the prettiest and sharpest knives I have ever handled. I love them but I have to be careful when using them. Once when I was washing the santoku I nearly cut the sponge in half.

The santoku cuts beautifully. I feel like a kitchen ninja with it in my hands.
My tomatoes and peppers look like they were sliced by a machine... Nope, it's just me.
Katy the kitchen ninja!

The trimmer is great for cutting breads and carving.
I like it. It's handy.
I'm satisfied.
Done.
I never need another knife again.
Really.


Even though these are dishwasher safe I only hand wash them, them dry them really well and then store them in a wooden knife block. I never allow my knives to come into contact with any other hard surface, only wood.

This is hard at times since we have stainless steel countertops.

So after getting these knives I also made a trip to Ikea to pick up a few sturdy wooden cutting boards. These will help the blades stay sharp for a longer period of time. Of course, since wood is porous I shouldn't cut meat or fish on them, only fruits and vegetables. No problem.

When I do cut raw meat or fish I use a plastic cutting board but make sure not to cut too hard into the surface as this can also leave behind bacteria and dull the blade.